Main
Page 2 of 21

November 23, 2019

Rice Mice are Nice Mice - and 3 New Ones

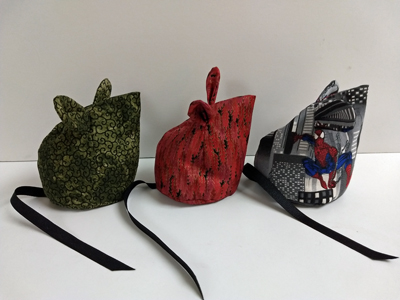
I just made 3 Rice Mice for the 3 very young children who will be part of our Thanksgiving celebration.  I wanted these 3 young ones to have something special and I decided to make more of my rice mice (plural; rouse mouse singular)).  They each have 8 ounces of plain white rice inside and are actually cuddly.

Three%20Rice%20Mice.SIZE.jpg 


There are two books about Rice Mice.  The one on the left was written by my medical mentor's wife.  He gave me a copy and I've made them for many children, starting with my own 3 children and our 8 grandchildren.  When I put them on my blog, now several years ago, several people looked for the book  unsuccessfully.  It was republished with some new poems and illustrations about individual mice drawn by Ann Hayes and Heather Refetoff.  Copies could be purchased then directly from Ann Hayes. 

RiceMice%20and%20Books.SIZE.jpg 


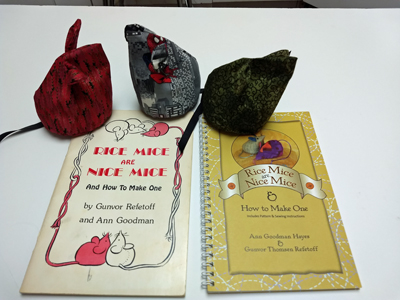
Knowing how many people who follow my blog bought the new copies, I'll add a link to the blog post from that time.  I haven't been in touch with Ann in several years, but I would be happy to find the Rice Mice book again if anyone wants one.

http://www.paperandthreads.com/2010/10/rice_mice_are_nice_mice.php 


May 16, 2019

Single Signature Pamphlet Book in Boards

I love this book structure, and my student and I each made one this month.  You are limited by the number of folios you can put in a single signature.  Hers had 10 folios of a drawing paper.  Mine had 4 folios of a Fabriano Artistico watercolor paper.  Instead of tipping on end papers to the front and back of the page block, you fold both of them around the spine of the signature, along with a piece of bookcloth (2-4" wide piece of bookcloth as hinge) and stitch them all together in a 5 hole pamphlet stitch.  There are a few other small changes, but it is easy to learn and great for a small project of gifts.  I made my "bookcloth" with a piece of fabric I hand dyed and fused to a piece of Kozo paper. 

Front:

IMG_20190515_103845013SIZE.jpg 

Full Cover: demonstrating the gap between the front and back boards which allows the book to open flat.

IMG_20190515_103908176SIZE.jpg 


May 10, 2019

FIT Experimental Textile Screen Print #5

This was our final Screen Print project for the Semester:  We could use any screen print technique from the semester, on fabric, but we also had to add foil to the fabric.  I used screen filler and a 3 color reduction print and then added foil to the 3 squares.  The foils don't show up in photos like this.  See the foils below. 

IMG_20190508_100324400SIZE.jpg 


Foils:  I passed foil paste through my screen in the square areas, let it dry, and then pressed the foil to the fabric with a 375 degree press. 

IMG_20190510_063113715SIZE.jpg 


This was a paper collage I made in the Matisse Cut-Out Studio at MoMA.  The series of collages I made there inspired 2 of my projects at FIT.

IMG_20190510_063234763SIZE.jpg 


April 26, 2019

Screen Printing Project Four

Source:  We converted art photos to half tones, and made photo emulsion screens to print our images.  This is a sketchbook ink and watercolor painting I made many years ago in London.  My two oldest grandchildren, who are now teenagers, were walking in front of us in Hyde park when our one year old granddaughter turned to her 3 year old brother and said "HAND and he obliged!"  I quickly snapped a picture of them, and her monkey, and painted it at home that day.

HenrySydCropSIZE.jpg 


First 2 Color Screen Print on Fabric

HandS.liteSIZE.jpg


Last 2 Color Screen Print on Fabric

HandS.darkSIZE.jpg 

April 5, 2019

Screen Printing Project 3

Screen Print on Fabric:  For the 3rd of our projects this semester, we had to create two "positive" images, and burn them into screens, registered, and make 2-color prints on fabric.  Registered means that you can easily place the print from one screen exactly on top of the print from the other screen.  I had the fashion model with the horizontal stripes on one screen and all of the calligraphy/typography on the other screen.  The first screen was printed in black (figure) and the second one in charcoal gray (typography).  The print measures 15 X 19"  The background fabric is white.  

IMG_20190327_101422518SIZE.jpg 


Original Art Inspiration:  I sketched a live model in a Fashion Illustration course last year and then collaged over the drawing. 

IMG_20190327_102527661SIZE.jpg 


Creating the designs for the Screens:  The positive images for the screen #1 were created by collaging black paper and typed words, that were printed on a transparency, to create the blouse.  All the pieces were taped to heavy vellum to photograph (burn) them onto a photoemulsion screen.  The calligraphy for screen #2 was printed on transparency sheets and cut out and taped to a second piece of vellum to make the other screen.  Here are the two sheets of vellum clipped together for me to test the image.

IMG_20190327_102415670SIZE.jpg